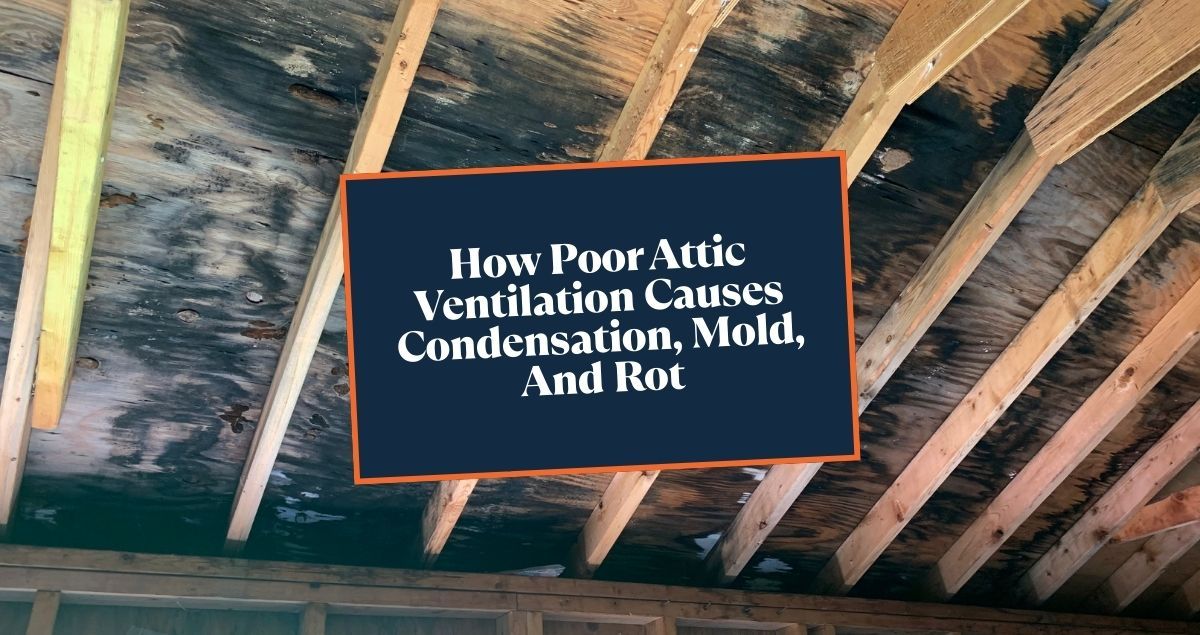


Homeowners are often told their attic is “under-ventilated” or “out of balance,” but rarely does anyone explain how that conclusion was reached.
TLDR: Ventilation requirements are based on attic square footage, typically one square foot of ventilation per 150 square feet of attic space. Contractors often misapply this calculation, creating systems that are under-ventilated or poorly balanced. Knowing the basics helps you ask the right questions.
Attic ventilation is not guesswork, and it is not solved by simply adding more vents. There is a logical process used to determine how much ventilation an attic needs and how that ventilation should be distributed. Once you understand that process, the conversation becomes much easier to follow.
This article explains how attic ventilation is actually calculated, in plain language, without formulas or technical code references.
What Attic Ventilation Is Trying to Achieve
The goal of attic ventilation is controlled air exchange.
A properly designed system:
- Brings fresh air into the attic at the lowest point.
- Allows that air to move through the attic space.
- Exhausts warm, moist air at the highest point.
In ideal conditions, attic ventilation is designed to allow multiple fresh-air cycles through the attic every hour. A commonly accepted target is up to roughly ten complete air exchanges per hour, depending on climate and conditions.
Homeowners do not need to measure this directly, but this concept explains why airflow quantity, balance, and placement all matter.
Step One: Start With the Attic Space, Not the Roof
Ventilation is calculated based on the size and layout of the attic space being ventilated, not the square footage of the roof.
This matters because:
- Two roofs with the same size can cover very different attic volumes.
- One roof may contain multiple separate attic spaces.
- Cathedral and vaulted ceilings often do not share a continuous attic at all.
A contractor who understands ventilation starts by identifying:
- How many attic spaces exist.
- Which areas are connected.
- Which areas must be ventilated independently.
If this step is skipped, the rest of the calculation falls apart.
Step Two: Determine the Total Airflow Needed
Once the attic space is identified, the next step is determining how much total airflow is required to ventilate that space properly.
This is where Net Free Area, or NFA, comes into play.
Net Free Area represents the amount of open space a vent provides for air to pass through after accounting for screens, louvers, and internal design. Vents are not wide-open holes, so their actual airflow capacity is always less than their visible size.
The ventilation calculation establishes a total required NFA for the attic. That total represents the combined airflow capacity needed to support consistent air exchange throughout the space.
Step Three: Split the Total Airflow Between Intake and Exhaust
Once the total ventilation requirement is established, the next step is distributing that airflow correctly.
Ventilation calculations first determine the total amount of airflow the attic needs. That total is expressed as Net Free Area. This total NFA is then divided between intake and exhaust.
In a properly designed system:
- Roughly half of the total Net Free Area is provided by intake.
- Roughly half is provided by exhaust.
Exhaust should never exceed intake. If a system is unbalanced, intake is increased, not exhaust.
This balance is critical. When intake and exhaust are properly matched, fresh air is pulled through the attic as intended. When exhaust exceeds intake, air is often pulled from unintended areas such as other vents or the living space below, which defeats the purpose of ventilation.
Step Four: Placement Makes the Math Work
Ventilation calculations assume that air can move the way it is intended to.
That only happens when:
- Intake is located at the lowest point of the attic.
- Exhaust is located at the highest point.
- Intake is continuous and unobstructed.
- Exhaust is continuous and unobstructed.
- All intake is at the same level.
- All exhaust is at the same level.
If vents are placed at multiple heights or mixed improperly, airflow short-circuits between vents and the calculation no longer reflects real-world performance.
Step Five: Adjust for Real-World Conditions
Ventilation calculations provide a baseline, not a finished design.
Real homes introduce variables such as:
- Multiple attic spaces under one roof.
- Insulation blocking airflow.
- Limited ridge length.
- Inaccessible soffit areas.
- Cathedral or vaulted ceilings that require separate airflow paths.
A knowledgeable contractor calculates ventilation first, then verifies attic conditions during installation and adjusts the plan as those conditions are uncovered.
This two-phase approach is critical.
Tools That Help Illustrate How Ventilation Is Calculated
To make this more tangible, ventilation manufacturers provide tools that help illustrate how attic size, product performance, and airflow requirements work together.
For example, ventilation selection calculators allow you to input attic dimensions and see how much intake and exhaust capacity is recommended based on Net Free Area and product ratings.
One such example is the Lomanco Ventilation Selector
Tools like this do not replace professional evaluation, but they help demonstrate the logic behind ventilation calculations and show why product selection and placement matter.
If you want to see how a ventilation calculator works in practice, we’ve included a short, plain-language guide below that walks through how to use one without overthinking it.
Sidebar: How to Use an Attic Ventilation Calculator, Without Overthinking It
Ventilation calculators are tools, not answers. They are meant to help visualize airflow needs, not replace a proper inspection.
Here’s how homeowners should use them:
- Enter the attic size, not the roof sizeThese tools are based on attic area. If your roof covers multiple attic spaces, each one should be considered separately.
- Focus on total airflow firstThe calculator will show a total ventilation requirement. That number represents the combined intake and exhaust needed.
- Look at how intake and exhaust are dividedA proper system balances the total airflow between intake and exhaust. Exhaust should never exceed intake.
- Notice how product choice changes resultsDifferent vent products provide different Net Free Area. Two vents that look similar can perform very differently.
- Use the tool as a conversation starterA calculator helps illustrate the logic behind ventilation, but a contractor still needs to verify real-world conditions like blocked soffits, insulation depth, and attic layout.
If a contractor cannot explain the results of a basic ventilation calculator in plain language, that is usually a sign the system was not thoughtfully designed.
Why Roof Replacement Is the Best Time to Get It Right
Roof replacement is often the only time a contractor can:
- Confirm how many attic spaces exist.
- Identify blocked airflow paths.
- Install baffles where insulation restricts ventilation.
- Adjust intake or exhaust placement once conditions are visible.
After the roof is installed, correcting ventilation becomes far more invasive and expensive.
What Homeowners Should Take Away
You do not need to know formulas or memorize code ratios.
What matters is that your contractor can explain:
- How the attic space was identified.
- How total airflow needs were determined.
- How intake and exhaust were balanced.
- How vent placement supports airflow.
- How the plan adapts to real-world conditions.
If ventilation is described only as “adding ridge vent,” then it was not truly calculated.
Final Thoughts
Attic ventilation calculations are not complicated, but they do require intention.
When airflow needs are calculated correctly, distributed properly, and verified during installation, ventilation supports roof performance, insulation durability, and overall building health.
In the next article in this series, we’ll cover the most common attic ventilation mistakes roofers make and why those mistakes often make conditions worse rather than better.